FujiFilm MX-2700 Digital Camera
Risk of Electric Shock - Do Not Open
I've had this camera a couple of years, and it's done a great job. But a
couple of weeks back I dropped it in a stream. The bottom half got soaked,
and the camera would no longer power up. Time to take it apart.
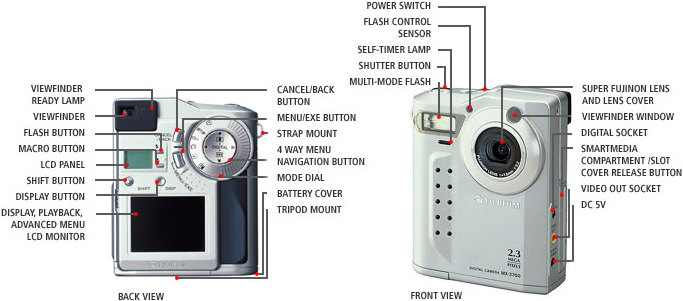
Here's what it looks like before you start messing with it. (Taken from the
FujiFilm web site).
Before you start I have to warn you about flash guns. All flash guns use a
capacitor to store the energy which they then release extremely rapidly to
make the flash. But capacitors aren't so fussy, they'll quite happily
discharge through, say, you! Let me tell you from first hand experience,
it hurts! While I was repairing my camera I electrocuted
myself three times, twice badly enough to cause burns on my fingers. As
with any electric shocks there is a risk of heart complications, so if in
doubt do not take your camera apart. And if you do, be careful. You do so
at your own risk.
I never know until I take something apart whether I really truely like it.
Before I took it apart I kinda liked it. Now I really like it. The case has
five screws in it, three at the bottom, and one either side. Actually
getting the case off is a little tricky, it needs a bit of wiggling back
and forth before it comes off. A couple of useful tips, you need to open
the battery bay, and opening the smart media slot doesn't hurt. I strongly
recommend taking the battery and card out before you start taking it apart.
You'll probably want to put them back when you start testing, but for now
it's not helpful.
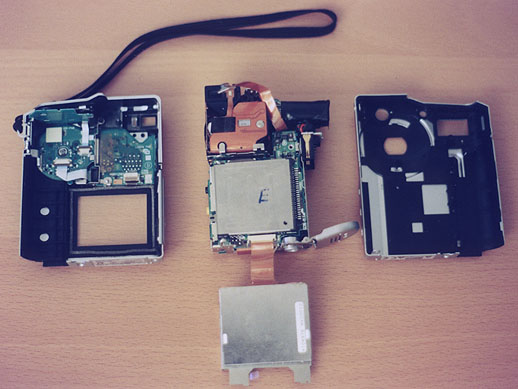
The front casing should come away first. The next thing you'll notice is a
number of ribbon cables. You'll want to unplug the back of the case from
rest of the assembly. Having done that you should have a big lump of
circuitry and the two pieces of casing. With a little extra work the
screen will also come away and then you'll have something that looks like
this below.
At this point as I turned the unit over without the case and saw water
droplets all over the bottom part of the camera. They certainly weren't
helping matters. Toilet tissue is a pretty good way to get the water off.
You can make very light contact which avoids doing any mechanical damage.
Things to watch for here is that you don't scratch the circuit board. With
the battery disconnected you can also safely touch the board, but be
careful to avoid the contacts anyhow. It's possible you could cause static
damage just by making electrical contact. To avoid this ground yourself by
touching the metal casing of an earthed electrical device. For now you can
keep yourself permanently connected to earth. But you should disconnect
before you start testing. Having a good route to earth with live power
supplies is generally not a good idea!
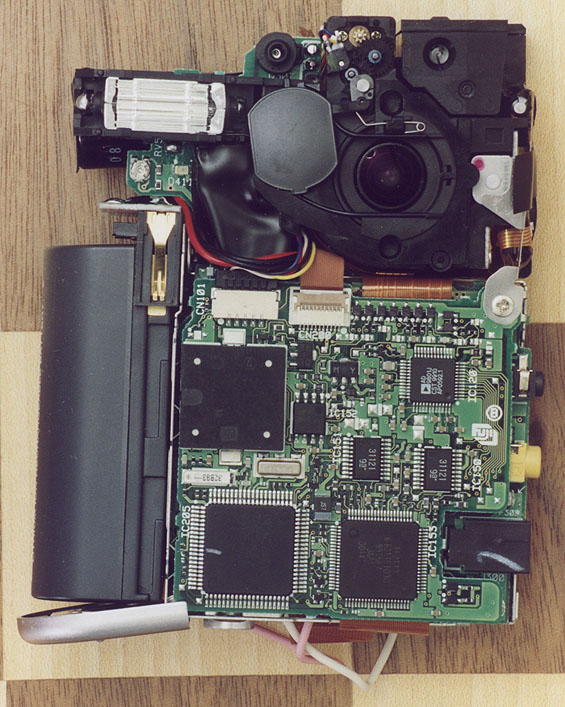
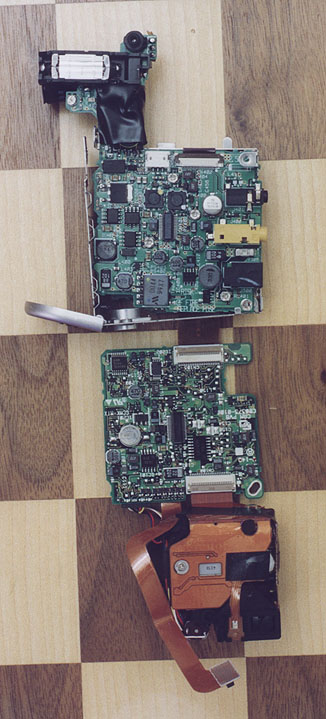
Having dried it, I turned it over and saw this. The electronics are all on
three boards, sitting above each other, and a small section for the flash
unit. Be cafeful about the flash, it stings. The optics are in another
self contained unit, with relatively modest mechanical connection to the
rest of the camera. You can see the three boards in the next photo. And
then below them you can see the smart media slot. Also notice the metal
brackets holding the boards in place. The screen also detaches easily, and
in such a way that you can clip it back in without any difficulty.
Now the nice thing is that these
brackets are lightly attatched. You can remove a few more screws and the
brackets allow the layers of boards to be unwrapped. The top two boards
also have a connector between them in the middle, which not only provides
an electrical interconnect, but also provides a good deal of mechanical
stability.
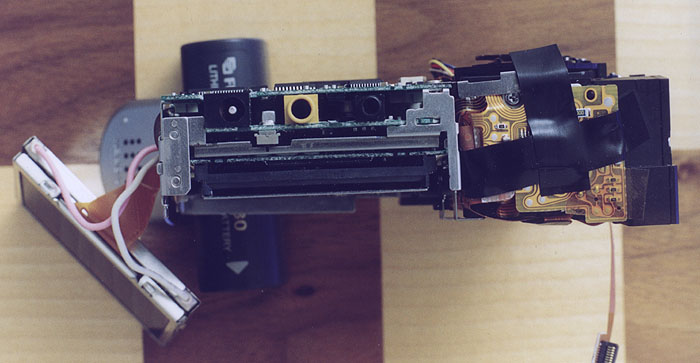
The various circuit boards can also all be separated. For my repair I just
needed to dry things again. Being able to separate them really made life
much simpler. It meant effectively that I could just take each board and
examine it for any damage, dry it, and give it a good shake to get any
water out. Doing that with the whole unit would have been pretty useless.
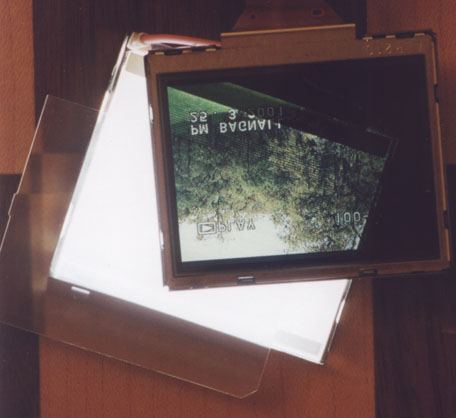
But the part which really impressed me was the screen. Having dried
everything else I inserted the battery and a smart media card. I
reconnected the controls in the back of the case to the main electronics.
Now the unit won't power up if the card bay is open, so to fool it I held
down the tiny microswtich it uses to detect if the bay is open. Holding
this down and turning the camera on is a little tricky, and a third hand is
useful here, but it's possible without. At this point with everything dry I
managed to power up the camera, and the screen lit up when I poked to
appropriate buttons. (It helps to put the back of the case back in place
for this). What I noticed now was that water had got into the screen and
was making the colour balance rather strange. So I powered down again, and
removed the card and battery and took the screen apart. This was the
impressive part. It was possible to take the screen apart! I separated the
LCD from the back light and dried yet more water up. Here I found the
backlight had two pieces of plastic covering it. These are diffusers. The
backlight consists on a small strip light which is attatched to a wedge
shaped fresnel lens. This distributes the light reasonably well but
without the diffusers you would see the lines of the fresnel lens in the
display. Of course there was water between these diffusers, so I removed
them and dried them.
My next test showed that everything was working just fine, and I managed
to take a photo with the camera while it was still in pieces. This is
something I generally recommend. If it's safe to do so test before you
reassemble. Replacing and removing screws, especially if you are screwing
into plastic eventually dethreads the hole, so you want to do this as
little as possible. There is a trick to avoiding dethreading, but it's not
fool proof, so even then yo want to do it as little as possible. The trick
is to put the screw into the hole, and then unscrew it. At some
point the screw will drop into the hole by one thread depth. Now start
screwing in. You want to unscrew slowly to be as precise as possible.
The final step is always putting is all back together. In this case it was
pretty simple, as the camera was well designed, and it went back together
without any real problems. And by the time I'd finished it was as good as
new.
The moral of the story is, you can fix it! I always attempt repair now, as
a matter of course if something is broken and out of warranty. Many times
I find I can fix the problem, and I figure, what have I got to lose, so
remember, when they say "no user serviceable parts inside", they weren't
counting on you!
© Peter Bagnall 
|


